Hello guys, welcome back! This is Adam, and this is the eighth chapter in the Azure Fundamentals Course. In this chapter, we will cover the most basic things about resource management in Azure. So, what are resources, resource groups, and resource manager? Stay tuned!
Core Building Blocks
One of the most important things you need to learn when working with Azure are the core building blocks for managing Azure services. These building blocks consist of resources, resource groups, and resource manager. We will also cover the benefits of using these core components when building solutions in Azure.
Understanding Resources:
When users go to Azure, they purchase services, such as SQL Database, web application hosting, or simply a virtual machine. However, it doesn’t matter which service they buy; in the end, all those services are represented as a generic object called a resource. You can think of resources as objects that represent your services in Azure—they’re basically your contracts representing a service lifecycle.
So, as soon as you purchase a service in Azure, you create a resource. Once you’re done with the service and delete it, the resource is also deleted. Azure uses resources to save all the configurations that you make for your service. Pretty much any configuration option that you have for your service is represented as a property on that resource.
JSON Template and Common Properties:
All the resources in Azure can be represented as a JSON template. JSON stands for JavaScript Object Notation, and it’s a simple file that has properties and values. It’s one of the most commonly used standards on the market to describe pretty much any object today.

We don’t need to deep dive into the specifics of this JSON format, but you should at least know that there are four common properties across all resources: type, API version, name, and location. There are also some other non-common properties that are different and used to describe different resources and services within Azure.
Resource Groups:
No resource in Azure can be created without something called a resource group. A resource group is a logical container for resources and is required to create any resource in Azure. For you, a resource group is a grouping of resources, but you should use it to logically group related resources.

It’s not a hard requirement, but resource groups were created as a utility to manage other resources. Therefore, you should take advantage of them. So, how do you know how to group resources together in resource groups? Well, there are many strategies to do so.
Grouping Strategies:
For instance, you might apply a strategy where you group your related resources by type. In that case, you could have resource groups for your SQL databases and separate resource groups for your web applications. A more commonly used strategy is grouping resources by application lifecycle—having your development resource groups separate from your production resource group, so that you can apply different scripts, different policies, different security rules, and different access management policies.
You can also organize by department name or use resource groups to group resources for billing purposes. For instance, creating a separate resource group for each cost center within your organization. Additionally, you can create resource groups by location (Azure region) so that it’s easier for you to manage data sovereignty and security compliance requirements for your organization.
Choosing the Right Strategy:
There is no one-size-fits-all strategy for organizing resources. Most organizations use a mix of these strategies, like combining application names with environment names, to fully separate the application development lifecycle from their production lifecycle, while also ensuring total separation across multiple applications.
Creating a Resource Group:
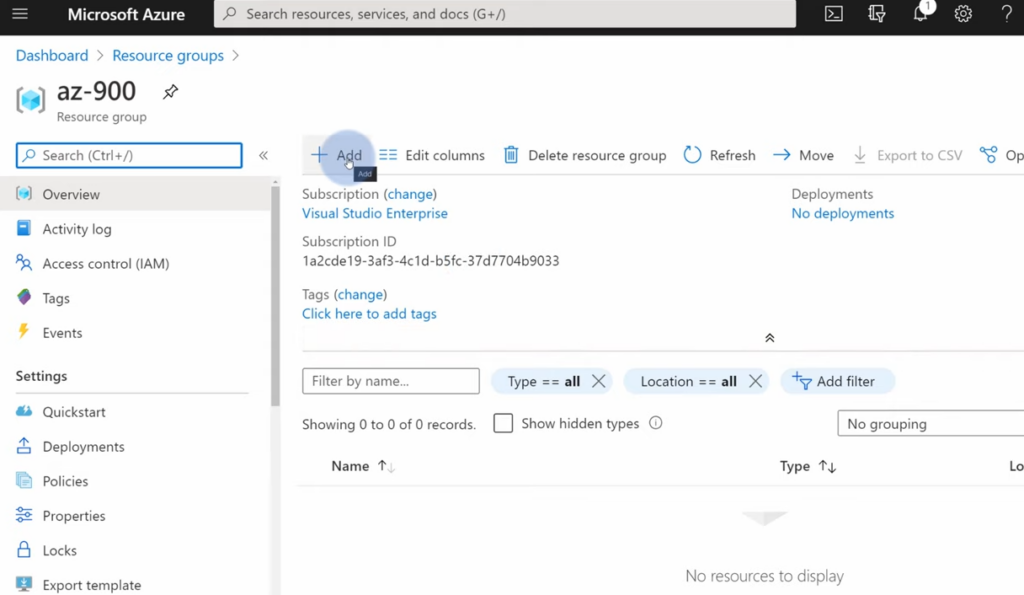
Now, let’s move to the Azure portal so I can show you how to create a resource group. First, go to the menu on the left-hand side, select Resource Groups, and click on the Add button. A form will appear where the first property you need to select is subscription, which is a billing unit for your entire Azure account. In my case, it’s a Visual Studio subscription.

You also need to provide the resource group name. I will call mine az900. This will be the resource group that I will use for the remainder of this course. Then, select a region. This is where the metadata about the resource group is contained. Remember, the region here is not relevant to the resources themselves because you can have resources in different regions.

Hit Review and Create. Before anything in Azure is created, you will see a validation screen—think of this like a receipt. It will summarize all the properties and options you selected for the resource group. If you are sure you want to create the service, simply hit Create.
The creation of the resource group is instantaneous and resource groups are free, so you can create as many as you need without worrying about charges. Once created, you can navigate to the resource group to review its contents.

Creating Resources:
Right now, we don’t have any resources to display because we didn’t create any resource yet. You can either hit Add here to go to the marketplace and create resources, or use the menu on the left-hand side. For instance, by going to Storage Accounts. Storage Account is a service used to store files in Azure. To create one, simply hit Add.
You’ll see a form that you need to fill in, and always the mandatory fields are subscription and resource group within that subscription. Once you select the resource group, you need to fill in some common properties like storage account name. I will name mine amdemostorage123a.
The validation passes, so this name is currently available, and I can leave everything else as default. If I go to Review and Create, again a receipt will be shown, summarizing every property that will be used to create my service. If I’m sure, I can simply hit Create, and that’s it! This is how easily you can create resources in Azure.

Managing Resource Groups:
Once the resource has been created, you can click on Go to the Resource to go directly to the Azure service and start managing it, or you can navigate back to the Resource Group to review it. A Resource Group is a logical container allowing you to manage the resources within it.
Additionally, there is an Access Control panel here. One of the purposes of resource groups is access control. In this panel, you can add permissions for your colleagues, making sure that your development team has the proper privileges to manage all the resources.
To do this, simply hit Add Role Assignment, select the role, which is a grouping of privileges for managing other resources. For instance, selecting Owner means everyone can do anything within that role. You can then assign this role to an account in your tenant.
Once you click Save, you’ll be able to find the person in the Role Assignments section. For example, Tom is now an Owner, just like me, so he can do anything with this resource group and all the resources within it.
Using Azure CLI:
Additionally, anything you do in the Azure portal, you can also do from the command line. For instance, using Azure CLI—a simple command-line utility for Azure. You can write az login to log into Azure, which will open a browser window asking you to log in. Once you do, you can go back to your CLI and start working with Azure in the same manner.
Managing resources and resource groups from CLI is as easy as in the portal. If I type az group create –name az900-2 –location northeurope, this will create another resource group named az900-2. If I type az storage account create –name amdemostorage123b –resource-group az900-2 –location northeurope, a storage account will be created using the CLI.
Once this process completes, you can navigate to the resource group az900-2. When you open it, you’ll find the storage account that we just created.
Azure Resources Explorer
One additional thing I want to show you is the Azure Resources Explorer portal. Here, you can review the JSON definition of the services we discussed. If you want to see the common properties for the service that you created, you can find it here: expand Subscriptions, go to the Resource Groups, az900, open Providers, select Microsoft.Storage, and you’ll find your storage account and all the properties within it.
A cool trick is that if you don’t like this kind of navigation, or don’t know how to search for the service you just created, you can copy the URL starting from subscriptions and paste it after https://resources.azure.com/. This will automatically navigate you to the resource that you’re browsing in Azure Portal, showing all the common properties for that particular resource.